


Description
Your factory pressure gauges can be sealed on several ways, two of them are mentioned below:
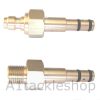
By means on a bonded seal what is on the pressure gauge treaded part.
Below the factory pressure gauge there can be an o-ring or a plastic washer. (picture above)
If there is a plastic washer (FX impact MKI) or o-ring (FX Dreamline, Edgun) under the factory
pressure gauge we would advise to remove it and replace it for one of the supplied o-rings that
comes with the new pressure gauge. (the old seals are often hardened or worn)
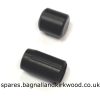
The gauges come with 2 sizes of orings. There is a difference in thickness what will give you some
extra flexibility in the alignment of the gauge.
Start with placing the thinnest 2.5 mm thick oring and screw the Huma-Air pressure gauge handtight
in the hole. About 6 full turns would be advised as minimum length to screw it in.
Do not overtighten the gauge! When it does not line up correctly, then unscrew the gauge and
remove the thin o-ring and replace it for the thicker one. This thicker one will give another position of the gauge when screwed in. Use only 1 o-ring
and tighten the gauge by hand or use a spanner and use very low force.
After filling, if the gauge shows no pressure, the gauge may be tightened too far causing the o-ring to block the
path hole. In this case, start again with de-pressurizing the rifle and re-follow the staps.